By Ron and Rocio Bearer
The Art Glass House
While the blueprints provided exact detail for the size of the glass inserts, the blocks were hand made. A test set made out of half-inch window glass was made first just to get an idea of how close the shapes were. These samples were sent up to Jeff Baker, the supervising architect in Albany, NY. New measurements were provided and the blueprints were adjusted.
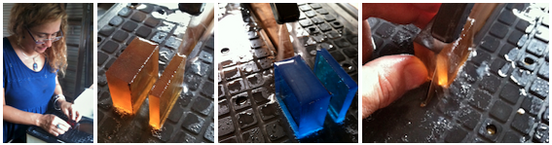
The second set was made from half-inch aluminum. This material was chosen for a few reasons. First it is durable and can be pressed into the cement blocks without the risk of cracking. While these were test-fit onsite, it was common that they needed to be pried out or knocked out from the other side of the wall. Glass would have been too fragile for this.
The second reason was that they could be fine-tuned with a normal metal file. This eliminated the need for power tools for this test fit. The final reason is that metal acts as a good material to make molds and cutting jigs from. Once the final shape is set, they act as nice guides to hold angles while cutting.
Most of the aluminum samples fit perfectly. One small rectangular piece needed to be reduced in size evenly. Three "L" shapes had to be modified again. These last three pieces were prepared in glass for a final test fit.
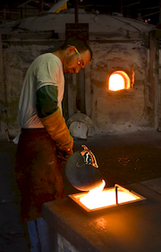
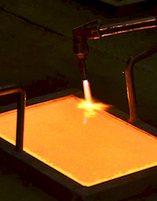
The glass is made in color batches. The technique for pouring molten glass into blocks has been around for over a hundred years. In fact, these custom glass blocks were poured in an American factory that has been open since the late 1800s.
The molds are made of solid steel square bar. They are placed on steel tables or in this case, graphite slabs. Graphite can endure the heat and remain slick enough that the glass will not stick.
When the glass starts to cool, the steel mold is lifted off the glass block. When the glow fades and the glass stiffens, the blocks are picked up and placed in an oven which maintains their temperature at over 900 degrees. The oven "kiln" slowly cools over three days to anneal the glass, preventing any stress within the blocks. The blocks in this first step required over 1600 pounds of glass.
Water jet machines are used for basic cutting. This is an expensive process due to the use of garnet powder as the cutting medium. This saves a lot of time when working with many smaller pieces. However, small pieces would fall through the grid, so the pieces are left with an 1/8" tab connecting them all. These glass pieces are snapped apart and then hand beveled where the tabs were.
The final shaping is a blend of techniques. Glass saws with diamond blades are used to cut complex angles. This is where the aluminum pieces come in handy. Rather than dial in angles, the metal shape is placed on the base and the saw the blade is moved until it touches the metal.
The last step is the bevel machine. This fine-tunes the angles and removes the rough look of the cuts made by diamond blades. The glass pieces are not beveled to a perfect finish, because there needs to be some texture for the adhesive to hold onto during installation.